Sunday, December 18, 2011

These are two cards for the Hero Arts Sketch Challenge

I made this first card for my husband's birthday that he celebrated today. His gift to me was going to his restaurant of his choice and I would buy him dinner. So, we had a early dinner and he choose to go to Longhorn Steak House.
The stamps that I used are Hero Arts: Wild flower Garden CG170 and Birthday Sayings CL340. I followed the third sketch for the Hero Arts current challenge for this month.This second card was made for my sister and her husband. They recently bought a new house and I thought that this would be perfect for the first sketch in the challenge.

The stamps that I used are Hero Arts: Whimsical House CL484. For the sentiment I used the font MV Boli. This is a short post tonight as I have so many things that must be done before my kids get here for the holidays. I haven't posted much lately but I am grateful that I had this small amount of time to do so this evening,


Thanks for stopping by and I appreciate the comments. Hope that every one has a very Merry Christmas and Happy New year. God bless.

Saturday, December 10, 2011

Gift Cards and Envelopes

It has been a very long time since I posted anything on my blog. I have been very busy with trying to get everything ready for Christmas and I also needed a break. The break has done me good and I feel like making cards once more.
This year we are staying home and our kids and their families are coming home this year. It makes me very happy that we will be celebrating Christmas at our house and with our family.
One part of the challenge on the Hero Arts blog is making card sets. This set of cards will be entered in the Hero Arts current monthly challenge (December2011A) This is the perfect time for this because this set of cards will be going to my friend for Christmas.
I stamped each white circle with one sentiment per card and embossed with white embossing powder. Then I took distress ink and distress the circle and then stamped over each individual circle with the stamp. (See list of stamps that were used.) The card base for each card measures 4 1/4" x 8 1/2". The card measures 4 1/4 x 4 1/4 when folded in half.
The circle was cut from a Quickutz Nesting Circle (CC SHAPE 14024) and the outer circle is from Nestabilities Lacey Circles.

The envelopes are made from a 4 3/4 x 6 1/2" envelope. I sealed the envelope and turned it on its side and cut off 1 1/2" of the envelope. I cut out a 2" x 3 3/4" piece of pattern paper and scored it a half inch along the short side and then attached it to the back of the envelope that measures 4 1/2" x 4 3/4".


These cards were lots of fun and very simple to make. Thanks for stopping by and I appreciate the comments. Have a wonderful weekend.

The stamps that I used are Hero Arts:
Music Background CG222
Garden Bouquet CG172
Dots & Flowers S5213
Flower Bird Garden CG270
Inspiring Messages LL240

Monday, October 31, 2011

CAS-ual Fridays CFC26

This weeks challenge over at CAS-ual Fridays is to create a clean and simple card using the sketch that is pictured below.
This is my take on the sketch. I took the Dearly embossing folder (from the Dearly & Frost set Sizzix 657060) and inked up the non-raised portion of the folder with soft pool ink and ran it through my cuttlebug machine. Then I stamped the sentiment onto a tag with clear versa mark ink and embossed with white embossing powder. After the panel was assembled, I attached it to a 4.25" x 5.5" white card base. The sentiment comes from Stampin Up Merry & Type 122550.

Thanks for stopping by and I appreciate the comments.


Sunday, October 30, 2011

Penny Black Sketch Challenge

This weeks challenge at Penny Black is to create a card using this sketch below. I tried to get this card made all week, but didn't get around to making my card until this afternoon. This is my take on the sketch. The flower panel comes from Sizzix's Dots & Flowers Set (655838). I inked the embossing folder with Hero Arts soft green and ran it through my cuttlebug machine. Then I punched out four panels from Stampin Up's postage stamp punch and stamped the images onto each stamp punch panel. To finish off my card, I added a sentiment banner and placed the ribbon between the small square panels.


The stamps used are Penny Black: Flowers & Wishes 30-047, to you 30-067 (leaves), and Flower Gallery 30-031. Thanks for stopping by and I appreciate the comments. Hope that everybody's weekend was great.


Thursday, October 27, 2011

Christmas Cards & Ornaments

These are the last of my cards for this months Hero Arts Challenge. I had these cards and ornaments finished for a few days and totally forgot to get these posted. This first card is an inspiration from Kristina Werner. To see her card, please go here. I stamped the sentiment (Happy Wishes CL255 [discontinued]) onto the card base with clear versa mark ink and then embossed with white embossing powder. Then I stamped the Music Background stamp CG222 with clear versa mark ink. I added a border and then some red ribbon and trees for the finishing touches. For this card I followed the second sketch in the challenge but changed it up a little. Stamps used are: Flourish Pine S5247, Holiday Sayings CL343 (sentiment), and Joy Snowman 657781.


For these last two projects I decided that I wanted to make a few Christmas Ornaments and this is what I came up with. This ornament has a front and back side. The back of the ornament has the sentiment "Wishing You a season filled with all special things" comes from Hero Arts Stamp Wish Messages C2877 (Circa 2003). To make the frame of the ornament I cut white cardstock with the Lacy Squares Nestabilities Die and then Cut a smaller square die to create the cutout center. I cut a 3 1/2 x 3 1/2 inch square and stamped the Ornament in clear versa mark ink and embossed it with silver embossing powder. then I mased the ornament and distressed the paper with thumbled glass distress ink and then stamped the flourish background CG119 over the masked image. Then I colored the ornament with sky blue memento marker and went over the colored image and the flourish with Sakura star dust pen. The back of the ornament was done the same way as the front. The frame sits on top of the image with dimensional adhesive and front & back are adhered together.

This Ornament is done the same way as the ornament above; only thing different is I used different stamps and a different die. The penguin is from Hero Arts; cap and scarf penguin D5081. The stamped used on the die is Four Leaf Grid S5141. The red circle around the penguin was colored with Rhubarb Stalk memento marker and then I went over it with a clear Sakura star dust pen to give it some sparkle. The front and back of this ornament are the same.


It was fun making these cards and ornaments. The ornaments will be given away to one lucky person who attends my card class that I am teaching tonight.


Thanks for stopping by and I appreciate the comments. Have a wonderful evening.


Tuesday, October 25, 2011

CAS-ual Fridays CFC #25

I haven't posted a card for the CAS-ual Fridays challenge for over a month. I can't believe that it has been that long. This weeks challenge is to "use any medium (markers, pencils, watercolors, blending pens, etc) to add color to your stamped image". Here is my card that I made for the challenge. I stamped the Decorative Tree Stamp (Hero Arts) K5440 unto a 4 1/4" x 5 1/2" white card base and then colored the leaves and ornaments with Faber-Castell PITT artist pens. Then I went over the image with a clear spica pen (made by Copic) to give the tree some glittery shine. The shine is hard to see on camera, but in real life it sparkles. The sentiment is stamped with Hero Arts Traditional Messages LP178. I am also entering this card in the Hero Arts Challenge for this month. Thanks for stopping by and I appreciate the comments.


Monday, October 24, 2011

90 Minute Scramble

Today I participated in a 90-Minute Scramble that was hosted by MyPink Mexico(call me Mary Dawn) (Mary is part of the Hero Arts Flickr group). The challenge was to create a birthday card using Hero Arts stamps and one of this month's sketches. Or we could create a Christmas card using pink--a little or a lot. This is the card that I came up with for the challenge. This was the fastest card that I ever made. I could not believe that it only took me about an hour to make this card. I guess that I need to challenge myself more often. Being part of this challenge showed me that I can make a card within 90 minutes. It was fun making this card.
I cut my paper to 4" x 5 1/4" and covered the paper with forest moss distress ink. Then I sprayed water onto the Flourish Pine stamp S5247 and stamped the image onto the colored paper. To speed up drying, I applied an heat gun to the paper. For the ornament (magic of christmas CL462), I stamped onto white cardstock and embossed with white embossing power and fired brick distress ink was applied to the ornament and then the ornament was cut out. The sentiment (Very Merry Christmas CL543) was embossed and for the finishing touches I added two clear gems. I was very pleased in how my card turned out.

Thanks for stopping by and I do appreciate the comments.

Sunday, October 23, 2011

Christmas Tags

This week I have been busy trying to make Christmas tags.
I stamped the Christmas Pride stamp 40-075 onto my tag with tuxedo black memento ink and then masked it so that I could distress the background with wild Honey ink and then while the mask was still in place, I stamped over it with the Paisly Outline stamp 40-048. Once all that was finished, I colored the flower with a red copic marker and added a few pearls to finish off the tag.

This next tag was stamped with the Adornment 3996J Penny Black Stamp and Let It Snow stamp 30-086. Peeled paint and fired brick distress stains were used for my ink. After, inking the images, I distressed the background with wild honey distress ink. The sentiment was stamped with tuxedo black memento ink. This tag was an inspiration from Jill Foster. To see her tags please go here.

This third tag was stamped with the Jolly Friends stamp set 30-058. First I stamped the stocking onto the tag and then stamped it again onto white cardstock and then colored in with copic markers. When the coloring was complete, I cut out the image and attached it to the tag using dimensional adhesive. The sentiment comes from in a pear tree 30-035 stamp set.


This last tag was simple to make. I stamped the Christmas Note image 4097J onto a cut tag with tuxedo black memento ink and colored the image with copic markers. Then I used fired brick distress ink to ink around the edges of the tag. The sentiment comes from the in a pear tree penny black stamp set 30-035.


The Penny Black blog has a card challenge every week. I had time, so I am entering these tags into the challenge. Here are the directions to enter the challenge:

CARD CHALLENGE Create a *new* Penny Black stamped gift tag and load it into their Gallery by Midnight Sunday night, PST. Be sure to tag your entry with “pennyblackgifttag“. They will choose a random winner to receive a Penny Black prize package. The winner will be announced on Tuesday.
You’ll love all the gift tags we have lined up this week. We hope your week at the Penny Black Blog inspires you to join our Gallery if you haven’t already, and upload YOUR Penny Black artwork!

I am entering these tags into this challenge. Thanks for dropping by and I appreciate the comments. Have a wonderful day!!

Monday, October 17, 2011

Christmas Planner

I will be teaching a card class next week at my church and I wanted something that I could ramdomly give away to one person. I thought that a Christmas Planner was the perfect give away. This is the front of the planner. The main image panel is 5" x 8.5" and it has 4 pages inside that have pockets. For this first part of my project, I stamp the Starry Sky S5448 stamp onto white cardstock with silver ink and embossed with silver embossing powder. Then I distressed the panel with broken china and chipped sapphire. The trees were stamped with the Merry Christmas trees stamp set CL459 unto white paper and embossed with white embossing powder. Then I colored them with bundle sage distress ink and forest moss distress ink. Then I cut them out and mounted them with dimensional adhesive. The deer is called Young Deer D5234 and colored with copic markers. The snow was embossed with swiss dots embossing folder and I used light blue stickles on the edges of the torn paper.

Planner Closed
This is page one and two of the inside of the planner. The pockets measure 4.5" x 5" and there is a total of 4 pockets (receipts, cards sent, events and parties, gifts) On page one, I stamped the Hanging Christmas Ornaments stamp CG221 onto white cardstock (twice) with white ink and embossed with white embossing powder. Then I distressed it with broken china distress ink. On the second stamped image, I colored each orniment with individual distress inks and then cut each orniment out and paper pieced them to the panel. For page two I stamped the raindrop background stamp S5101 onto white cardstock with white ink and embossed with white embossing powder. The background of this panel was colored with a baby blue chalk ink. The stamp Joy F5246 was stamped onto white cardstock with Soft Pool ink and cut with a Spellbinder die.
pages 1 and 2


For page three I stamped the four framed snowflakes CG209 onto white cardstock with baby blue chalk ink and embossed with clear embossing powder. The word winter (Create Your Own CL368) was stamped onto white vellum and embossed with white embossing powder and then I glued it to the panels with glossy accents. On page four, I distressed the paper with bundled sage and forest moss distressing ink and then stamped the Classic Holly stamp CG229 using forest moss ink. I added red nailheads for the berries. The sentiment under the Holly comes from Holiday Sayings CL343.
Pages 3 and 4

Another view of all 4 panels open (inside--pages 1-4)


Planner opened flat


The background paper that is behind each panel is from Stampin Up. The back of the planner is also covered with Stampin Up Paper. To hold the planner closed, I attached ribbon and tied it into a bow. The total measurements (when opened flat) is 8.5" x 20". Each panel is scored at 4.5" and folds up accordion style.

This was a fun project to make and I the time went by very fast while I worked on this. Thanks for stopping by and I appreciate the comments. Hope that everyone has a wonderful week.

All stamps are from Hero Arts.

Friday, October 14, 2011

Snowmen and Snowflakes

This card was meant to be uploaded to the Hero Arts Flickr group october2011A challenge, but I didn't get it finished because of sleepiness. I stamped and colored the snowmen and snowflakes last evening and after I finished, I couldn't decide on what paper to use. So, I put it aside and left it until this morning. Leaving it for awhile gave my brain a chance to think about the design.I used the last sketch to make this card, but changed it little and also made it a Christmas theme. This card will be entered into the second half of the Hero Arts Flickr group challenge. To learn about this challenge, please go here. I guess that it is better late than never. Anyway, this was fun making and I like the way it turned out.
The stamps are Hero Arts: Framed Flakes B4263, Framed Frosty B4264, and the sentiment was stamped and embossed with the Holiday Wishes Stamp set CL255. Thanks for stopping by and I appreciate the comments. Hope that everyone has a wonderful weekend.


Thursday, October 13, 2011

Butterflies

For today's card that I am entering into the Hero Arts Flickr group challenge, I decided to make a Thank You card instead of a Christmas card. In order for this card to qualify, I used the the Merry Christmas sketch that is pictured here. I distressed the background paper with Age Mahogany distress ink (by Ranger) and then stamped the butterflies with the same ink. I wasn't planning on doing a monochromatic card, it just turned out that way. The butterflies are from Hero Arts/Sizzix stamp set Playful Flowers and Butterflies 657778. The frames are from The Frames with Sprigs set 657775. The sentiment comes from Mix and Match CL266. This was a fun card to make and I really like the idea of dies matching the stamps. Thanks for stopping by and I appreciate the comments. Hope that everyone has a great weekend.


Tuesday, October 11, 2011

An Ivy Christmas

Here is a quick card that I made for the Hero Arts Flickr group challenge (October2011A). One part of the challenge is to use non-holiday stamps to create cards. For this card, I chose the Silhouette Ivy K5313 by Hero Arts. I inked the image with white ink and then embossed with white embossing powder. Then I used worn lipstick and fired brick distress ink to color the paper. Then I stamped over the image with fired brick ink using the Flourish Pine stamp by Hero Arts S5247. The sentiment is a Hero Art stamp and came from the Holiday Sayings CL343 stamp set. The green panel was embossed using a flourish embossing folder by provocraft. Thanks for stopping by and I appreciate the comments.

Sunday, October 9, 2011

Christmas Cards

I've started making my Christmas cards this week. I entering them into the Hero Arts Flickr Group card challenge.
For this first card, I stamped the image onto white cardstock with versa color cyan (VS-19) ink and clear embossed it. I love how the light blue gives off a sense of peace. On the bottom of the image I applied 3 layers of holographic embossing powder to give the appearance of snow around the trees. the snow is hard to see on camera. The stamps used are Hero Arts: Starry Night CG224 and Holiday Sayings CL343. I used pearlescent paper for the cardbase. For this next card I stamped the snowflake with silver ink and embossed with silver embossing powder. The stampsed used are Hero Arts: Four snowflakes CG210, Holiday Sayings CL343, and Swirl Christmas CL469.

This card is an inspiration from Jennifer McGuire's canvas leaf thank you card that is featured in the Nov/Dec 2011 papercrafts Magazine, page 61. I took the three holiday messages stamp LL956 and used all three stamps as a background for my card. There are three stamps in this set and I alternated them onto the card base. I used the flower from the frames with sprigs stamp set from hero arts/sizzix 657775 and turned it into a christmas flower. I heat embossed the flower and the sentiment onto sticky back canvas with white embossing powder and once the canvas was cool, I went over the fabric with pine needles distress ink. I used Jennifer McGuires same design but changed the colors and the stamps. I enjoyed making this card and working with the canvas was easier than I thought it would be.

For this last card I embossed the Christmas trees with silver embossing powder and also inked the trees with silver ink. The sentiment was done the same way. The silver around the edges of the panel behind the trees was also embossed with silver powder and silver ink. the background embossing folder is by provo craft D'vine Swirls 37-1142. The stamps used are Hero Arts: Three Trees LP123 and Holiday Sayings CL343.

Thanks for stopping by and I appreciate the comments. Have a wonderful week.


Saturday, October 1, 2011

World Card Making Day October 1, 2011

Today is World Card Making Day. It is the time of year when card makers from around the world sets aside some time on this day to make cards. I planned on spending the whole day devoted to making cards. But, a lot of cards did not get started due to other things happening. This is the only card that I made, but at least I made one and I enjoyed making this card. Actually, this card is an inspiration from Tami Hartley's card that was posted today over on Hero Arts. I CASED her card from todays posting over at Hero Arts. I used her same design but the only thing that I did different was to use different stamps and change the border slightly.
The stamps used are Hero Arts: Starry Sky S5448, Good Cheer Messages LL260 (circa 2008), and Holiday Sayings CL343.
Hope that everyone had a "Happy World Card Making Day".


Let it snow

This winter card was not suppose to be a snowman. I originally planned to use a Penny Black hedgehog stamp, but the hedgehogs did not fit in with my design. I stamped the snow man with Memento tuxedo black ink by Tsukineko. I colored the arms, the scarf, and ear muffs with copic markers. The buttons are black gems. The snowman is by Penny Black "Warm and Cold" 3260H and the sentiment is also Penny Black "Let It Snow" 30-086. I love this snowman, he looks so happy that winter has arrived and that it is snowing. I am entering this into the "pennyblackwinter" challenge over on the Penny Black Flickr group. Thank you for stopping by and I always appreciate the comments.


Thursday, September 29, 2011

September2011B

I have had these 4 projects finished for about a week and I almost forgot to post them. I usually only make cards, but once in awhile I will do an occassional scrapbook layout. In this case, I did an 8 x8 page of my grandson Michael. He was 18 months in these pictures (He is now 7 years old; my how time flies by.) I used a few of the techniques from Inspiration Showcase Card Class. On the upper left hand corner, I embossed the paper with an embossing folder (used glossy paper) and then used Latte Chalk ink over the embossed area. The butterfly was stamped with Hero Arts Moments Background (E3019) stamp and I used Tea Dye distress ink. For the panel on the center right, I used the Hero Arts Fall Memories (E3375) stamp and stamped with white embossing ink and heat embossed with white embossing powder. Then I distressed the panel with distress ink (can't remember the colors). For the bottom left hand panel, I stamped a piece of layering paper with the Happy Definition Stamp (CG269) with scattered straw distress ink and then heat set it. Then I stamped the Maple leaf (CG228) with Poppy Chalk ink and used perfect pearls over the leaf. It was fun making this layout and I came to the conclusion that I need to put together more scrapbook pages of my grandchildren.
For this first card, I stamped the leaves (HA Real Leaves CL457) onto water color paper and used distress ink. After I stamped the leaves, I lightly sprayed each leaf with water so that the color would run a bit. Then I heated the paper with a heat gun. This technique is called "Wicking". To see how this technique is done, please go here to see a video.


For this second card, I stamped the trees (HA Whimsical House CL484) onto pattern paper and paper pieced the trees and added a sentiment.

For this last card I stamped my trees (Whimisical House CL484) onto white cardstock and colored them with copic markers. After I finished coloring, I took the colorless blending pen and put dots onto the tree to give it dimension. The sentiment is from the HA Friends stamp set CL351.

I am entering these projects to the Hero Arts September2011B challenge.

Thanks for stopping by and I appreciate the comments. Hope that everyone has a great day.


Wednesday, September 28, 2011

CAS-ual Fridays -- CFC21

This week at CAS-ual Fridays the challenge is to pick three shades of the same color and add the color brown to the combo. At first I tried purple and brown and did not like the colors together. I finished the card and left the card on my work table over night. When I returned to my work table the next morning, I decided that I did not like the colors or the card and decided to make a new card in different colors.

Here is the card that I decided to enter into the challenge. I took three different shades of yellow cardstock (Stampin Up) and stamped the flowers with Tsukineko Rich Cocoa ink (the lightest color doesn't show up very well on camera). I added brown ribbon down the middle of the center panel and added scalloped edges. The flowers are from Hero Arts. They are part of the new stamps and Die cut sets that Hero Arts and Sizix are making. The set is called: Playful Flowers and Butterflies 657778. I added glossy accents to the center of the flowers and also to the little dots on the outside of the flowers.

Thanks for stopping by and I always appreciate the comments. Have a great day!!


Wednesday, September 21, 2011

CAS-ual Friday's CFC #20

This week at CAS-ual Friday's the challenge is to create a Clean And Simple Mini Card no larger than 4 x4. The final measurement of this card is 3.5" x 3.5" square card. I use a simple technique of dry embossing the front panel with the Sizzix Dots & Flowers embossing folder and then lightly sanded over the top of the dots until the white core of the paper appeared. Then I lightly colored the top of the dots with markers. I learned this technique from the Inspiration Showcase card class taught by Jennifer McGuire

I had lots of fun coloring the butterfly and the dots on the paper. I love making the mini cards because of their small size and that they are quick to make. The stamps that I used are Hero Arts: Sending Smiles CL490 (sentiment) and Three Artistic Butterflies LP215. I took the words from the sentiment "You Are Very Special To Me" and cut them apart so that I could use only a portion of that sentiment.


Thanks for stopping by and I do appreciate the comments.


Saturday, September 17, 2011

The Penny Black Blog Challenge

for this week is to make a card using the colors purple, Green, and cream.

I usually have a difficult time deciding how I want my cards to look and sometimes I go to my pagemap sketches to get an idea for my layout. (A lot of times I just can not visualize how my design will look.) Going to these sketches help me a lot; guess that I should use these sketches more often.

The stamp that I chose was perfect for this sketch. Most of the time when I begin a stamping project, I usually will stamp and color my image and then pick the paper and design. I do love it when I can make a card in under an hour. I guess if I used card sketches more often, it would not take me so long to make a card.
I spotlighted the 4th flower, but it is hard to see on camera. The image was colored with Prisma color pencils. I used yellow gems for the flower centers. The card sketch that I used came from here. The stamp set is Penny Black: Flowers & Wishes (30-047).


Thanks for stopping by and I appreciate the comments. Have a wonderful week end.

Thursday, September 15, 2011

Inspiration Showcase Card Class

I am still on day one of the Inspiration Showcase Card Class. I have gone through the lessons for the first three days, but I am behind in class. That is Okay, I am having fun learning about all the techniques that Jennifer McGuire is teaching. She is an awesome teacher and she makes some gorgeous cards. Thanks Jennifer for teaching this class.
The technique that I used for this card is called "Patterned Paper Trapped Embossed Resist". I stamped the Lotus background (CG349) stamp with clear embossing ink onto pattern paper. Then I heat embossed with clear embossing powder. When the embossing was cool, I rubbed Faded Jeans distress ink all over the embossed paper. Then I buffed the resisted ink with a dry cloth. Once the technique was finished, I assembled the pieces for my finished card. The sentiment (Smiles and Laughter F2361) on the tag was stamped on white cardstock in black ink and I used a decorative edge corner punch for the bottom of the tag. Thanks for stopping by and I appreciate the comments. Have a wonderful day.

Wednesday, September 14, 2011

These cards are for

three different challenges. My owl card, below, is for the CAS-ual Friday challenge (CFC #19). this week's challenge is to make a card that is paper pieced. I choose three owls from the "Owl Together Now" stamp set from Stampin Up! The paper that I used were scraps that were left over from other projects. I made this next card for the Hero Arts challenge. For more details on their challenge, please go here. The stamps are Hero Arts: Thoughtful Messages CL184, Tall Pumpkin G5269, and Traditional Pumpkin F5270. The pumpkins were colored with Prisma color pencils and I lightly blended some antique linen distress ink around the pumpkins using a blending tool.


This last card is an inspiration from Jennifer McGuire. I am currently taking the Inspiration Showcase card class that she is teaching on-line. The technique that I used for this card is called Paint Resist. I inked up the flowing flowers stamp with a pearl paint dabber and then let the paint dry before going onto the next step. After the paint was completely dried, I inked up a blending too with Tatered Rose Distress ink and inked around the outside edges. Next I applied Antique Linen to the center of the image. Then I buffed the image with a damp cloth to remove the resisted ink.

Stamps used: Flowing Flowers CG146 (hero arts). The sentiment comes from C.C. Designs (Amy R stamps) stamp set "Get well Sentiments".


Thanks for dropping by and I appreciate the comments. Have a wonderful day!


Friday, September 9, 2011

It seems that lately

things have been preventing me from making many cards. I keep telling myself that I will make the time to at least stamp a few images so that I can turn them into one or two cards. But, before I know it, the whole day has gone by and I feel as though I have not accomplished anything. It took me all week to make these three cards, but at least I did got them finished. And, now that I think about it, I did accomplish something positive. I will be entering these cards into this months challenge on the Hero Arts Flickr group. For the "time for thanks" card I used the following Hero Arts Stamps: Graph Background S5435, Big & Small flowers CL374, Blossom Art CL495, and So Thankful CL466.


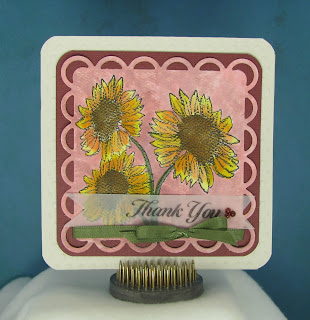
The Hero Arts samps that I used for the Sunflowers card are: Three Sunflowers S5420 and Find Joy CL497. The Hero Arts stamps that were used for the butterfly card are: Silhouette Grass S5316, Antique Engraving CL383, Envelope Pattern S5507, and Everyday Sayings CL342.

Thanks for stopping by and I do appreciate the comments. Have a wonderful weekend.